
We moved in the middle of summer of 2021, so the 2022 garden is the first year at the house that we bought. Let’s get this out of the way right from the get go, this was fairly expensive. The wood for the raised beds was expensive, the lights for the seed starting were expensive, the dirt/compost/mulch? Also expensive. Could I have done this cheaper? Absolutely, had I been willing to cut a corner here or there, particularly when it came to the lumber. Turns out that the lumber I ended up getting was twisted beyond reason anyways, but that taught me an important lesson: Don’t buy big boards long without picking them out yourself. I probably could have guessed that all of the lumber would be going at least warp 2, but cupping and twisting ran rampant as well so the cost of the wood wasn’t justified, and that’s when you ignore that this was wood: ergo heavy and prone to rotting out in 5-7 years or so. Would I do this again? Absolutely, but not in wood. If I’m going to spend this sort of money on something I want to feel like I wouldn’t have been better served by just burning the money and planting in-ground.
Speaking of which, raised beds versus in-ground, a debate for the ages. In my case not really though since we just bought the house and while the grass looked nice and green that isn’t necessarily a good indicator of whether or not the dirt is any good structure wise, or even nutrient wise depending on the grass. Eventually I would decide to get rid of the 120+ foot tall oak tree (which was showing some troubling signs, namely unexplained die-off of smaller branches) in the back yard, and to plant three dwarf apple trees eight feet from the demarcation between my portion of the backyard and my wife’s section, which would require double-digging. This was my first experience with double digging, and all I can say is that there’s a fair amount of labor involved but I can’t argue with the results.
Anyways, I bring this up because the double-digging revealed that at some point in the past someone just buried a bunch of burnt trash in the middle of the yard. I’m assuming that it’s an old burn pile, but it’s not like I can ask around at this point. Besides, the stuff I found (mostly a bunch of shattered bricks, pots, rusted out cans, some severely rusted away dinnerware, as well as handfuls of broken glass because OH BOY isn’t that fun, all amid a thick layer of ash) was roughly one foot down. Without the double-digging I likely would have never known it was there. I also would have missed the bajillion grubs that were present though I suspect that I would have figured that out eventually since it nearly killed 1/3rd of my lawn in the backyard, which my neighbor says first showed up about four years ago and have had to be treated for twice a season since then despite me not seeing this sort of issue last year, but I digress.
The point of this was that raised beds are a fantastic option if you don’t know what you are dealing with. In retrospect I should probably learn to be more concise, a lesson that I’ve been taught several times and which literally never seems to stick. Anyways. The garden of 2022 was a time of learning. Mistakes were made, a veritable cornucopia of them, yet overall I’m actually quite happy with how things turned out.
Before getting to the specifics, a bit of back story: 2022 was the first year that I would have the ability to plant a garden of any actual size. Prior to moving to this house I would garden in the backyard of the place that I was renting from one of my friends. The house was fine, the garage was a bit small even for our borderline compact cars, but the yard… oof the yard. Imagine a 2000+ish square foot house with four maple trees on the lot, a detached garage, an evergreen tree (spruce maybe?) of some sort in the front yard, and three trees overhanging the yard (as well as one honorary oak tree which, while not overhanging, would somehow manage to dump 70% of its leaves in the backyard every year the week after the last leaf collection for the season, without fail). Now imagine that the house has more square footage available than all of the yards (front, back, and side) did combined and I think you’ll get the idea. Nearly all of the yard was shaded out all of the time, with only a thin strip of the side and backyard getting more than four hours of sun each day, and though it was south facing it was also obstructed by a five foot tall privacy fence which was solid and let no light through at all. I couldn’t plant in the side yard, so I planted all of my garden in the twenty(ish) foot long by six foot wide section of the backyard that wasn’t shaded out entirely. That means that at most my garden in 2021 had around 120 square feet of plantable area, which it didn’t. Likely half that.
We moved to a house which sported an approximately 170’ long by 66’ wide backyard, roughly two thirds of which are mine to do with as I see fit, which only has a single large tree to contend with shade-wise. Needless to say though I’ll say it anyways, the increase in the amount of available space was… staggering. I now have a bit less than 7,450 square feet to play with. This was a bit of an adjustment, because I only had the tools required for a garden with roughly 75(ish) square feet in size. That meant a lot of tool purchases, like a straight rake, a pitch fork, a D-handled gardening fork (which I highly recommend), a D-Handle gardening spade (again, highly recommended) a 100 foot long heavy duty hose, a wagon for transporting stuff, a hose spigot that stands on its own in the yard, a bunch of mesh, cattle panels for the arches (which were a pain to get but definitely worth the effort, thanks Dad for the assistance!). A bunch of U-posts and T-posts, as well as a conduit cutter, several lengths of conduit, a slew of seed starting materials like heat mats/lights/tiny little pots/etc… it was quite a bit. I’m leaving so much out that it’s a bit laughable honestly.
Point is, the 2022 garden was expensive. The tools were costly, the wood was extremely expensive (yay for the housing market of 2021-2022 inflating building prices dramatically), the dirt also cost a bit but honestly? Compared to the tools and the wood (but the wood especially) I feel like I did really well with the dirt: half dirt, half compost and mixed in the suppliers dump truck I couldn’t have asked for an easier time of things with them. When autumn came and I decided that I needed ten more cubic yards of extremely finely ground organic mulch I knew exactly who to call, so I’m not complaining about that. Just, know that if you are going into this for the first time your first year is likely going to be a bit costly.
With all of that out of the way enjoy the pictures and info below.

Perhaps the most iconic picture of the 2022 garden, this photo captures what it is like to look straight down the main path which separated the beds roughly into two groups: on the left are the five 4’ wide x 10’ long x 12” tall beds: The front most is the bed that I gave to my father for whatever he wanted to plant (he loves to garden but lives in a condo so has no place to grow anything really), then it’s the eggplant/summer squash bed, then the brassica bed, then the bean bed with the bamboo A-frame style trellis that I built from 8’ long bamboo poles, then ending with the tomato bed. On the right there are also five beds: two 4’ wide x 6’ long x 12” tall pepper/squash beds, a 4’ wide x 6’ long x 12” tall cucumber/potato bed, a 4’ wide x 4’ long x 12” tall Swiss Chard/Catnip/Parsley/Lavender bed, and a 4’ wide x 4’ long x 12” tall snap peas/sunflower/winter squash bed.
The dirt was 50% gardening soil mixed with 50% compost filled to roughly the 10” mark in each bed, then organically fertilized. All of the beds were packed with moldering straw in accordance with the Core Gardening method. This helped, but not enough for our weird weather this year. Since our weather is typically a bit strange in retrospect I should have hand watered weekly. There was a lot of blossom end rot in the larger varieties of tomatoes and peppers but not loss of fruit in the smaller varieties which leads me to believe that the issue was ultimately lack of water.
Oops.
The arches themselves were built using two methods. The first method which is visible in the second (darker) arch was built using three of the arches that you would see decorated with flowers at weddings, connected side by side with black zip ties, with green plastic coated hardware cloth over the outside zip tied in place. I don’t recommend this method, I suspect that it will only last about two years and it ended up being much more expensive than the rest of the arches. It served as my prototype for arch construction though, and when I initially priced it was much more feasible than the other type because the panels in the other type simply weren’t available in my area at that time.
Thankfully that changed. The second style of arches is the style I’m going with from this point forward: it consists of four 6’ long T-posts and a single 16’ long by 4’ tall cattle panel from Tractor Supply. The posts were hammered into the ground using a post driver, with a post located at each corner on both sides of the walk way and driven into the ground securely, with the notches on the post facing away from the walkway. Then the cattle panel was put into place, which I did by myself, which word to the wise isn’t the easiest thing to do on your own since these panels are somewhat resistant to bending. As you can see in the picture the very first vertical support on each panel (horizontal in the picture) is located outside the posts on the side of the posts that faces outside the walkway, with the second vertical support (still horizontal in the picture) located on the inside of the walkway.
With this setup the tension that the panel is under keeps it in constant contact with the T-posts at all four corners, and it locks itself in place as you slide it down the notches. I have absolutely no worries regarding these arches, they will last well over ten years each and worked fantastically. I saw these sorts of arches mentioned by at least two gardening youtube channels, so credit where it’s due: Luke with MIGardener mentioned this method, as did Jess from Roots and Refuge. I recommend both of their channels, highly.
Also, it’s clear in this picture that I didn’t initially purchase enough mulch in the spring. No worries there though, I remedied that in the autumn, sort of with a vengeance.

Here we have the Brassica bed, containing three different types of Kale, two different types of Brussel Sprouts, and two different types of Broccoli/Broccolini.
The Kale: The Kale was a smashing success, with the Black Magic (aka Dinosaur) Kale stealing the show. Also present is Blue Curly Kale and Casper Kale, which only now in late fall has started to show the white marking on the leaves as would be expected with Casper Kale. I don’t even know if it’s a decent tasting variety since it tastes much like the Blue Curly Kale, or at least it did prior to the fall. The Kale did face an issue with leaf-miners, who like me much preferred the Black Magic cultivar nearly exclusively. I fought them all year, and it didn’t seem to help that much. I likely just don’t know what I’m doing and still ended up with plenty of Kale, but if you want a variety that doesn’t suffer a lot of pest pressure in the United States Midwest in zone 6B, well, maybe consider growing Black Magic inside of a greenhouse or not at all. I’ll still be growing it because it’s quite delightful.
The broccoli/broccolini/Brussel sprouts: The broccoli was a complete waste of time from an edible food perspective; they went from 6” tall to 4’ tall in just a few weeks, bolting from the temperature swings. Thanks Ohio! The little bit I was able to harvest was bitter to the point of being revolting, this may have been at least partially my fault as I planted a variety that matures quicker but my father also planted broccoli and while his had nice production they still tasted terrible. The broccolini was only slightly better, having the same reaction but about 2-3 weeks later. The jury is still out on the Brussel sprouts, as they are finishing up either now or in spring, I suspect spring if at all.

The tomato bed! A somewhat unhelpful view of it in fact since it doesn’t show the top of the supports. This bed consists of a couple different varieties of Basil (Opal and Italian Large Leaf), a winter squash plant called Festival which was obliterated by our resident squirrels, and several varieties of indeterminate tomato plants.
The supports consist of 6 U-posts (7’ tall I believe) secured in the ground with a post driver. On top of each of these U-posts is a small plastic hook sized for holding conduit, I had wanted to go with T-posts instead of U-posts here but the length of T-posts that I needed weren’t available and the PVC fittings that I was going to use cost 400% more than normal (thanks again housing market of 2021-2022!) so I went with U-posts instead. These hooks are cheap, which is good because they were cheap but is bad because they are cheap if you catch my meaning, I managed to bend one during the install. I look forward to spending less than two dollars next year to replace it though so no worries there. The hooks hold lengths of conduit which are connected together snugly through corner connectors and will likely last the lifespan of the garden.
Each tomato plant (18 if I remember correctly) is supported by a line attached to the conduit and dropped to ground level where it is secured with gardening staples into the ground. The plants attach to these lines via tomato clips roughly every 10” or so, a method that I cannot recommend enough. Doing it this way was so much easier than attempting to wrestle with tomato cages that are three feet shorter than the tomato plants that they claim to be able to contain. You may have noticed that my plant spacing here is pretty tight, the plants were roughly one foot on center. High intensity spacing here led to a bumper crop of cherry tomatoes in particular, though the pruning had to be kept up on to keep the plants disease free and healthy.
The tomato varieties that I planted were hit-and-miss: Gardener’s Delight I’d grow again but didn’t yield as much as expected, Blue Berries yielded a completely insane number of savory dark blue cherry tomatoes that I didn’t like the flavor of unless they were completely 100% ripe, Super Sweet 100’s were great as expected, Great White Tomatoes had great flavor but due to blossom end rot produced very poorly, as did the Cherokee Purple plants. Oxhearts did okay but not great, and the Rapunzel’s weren’t Rapunzel’s but tasted good and produced well, I suspect some cross pollination happened at the nursery with a pear style cultivar because the tomatoes were mostly pear shaped, thick skinned, and meaty, but red and numerous, but didn’t form in the long tresses that Rapunzel’s are supposed to. That was particularly disappointing because this is the second year of failure with the Rapunzel’s but at least this time it wasn’t my fault. In all cases I think that the production would have been improved with better watering habits on my end, particularly for the non-cherry tomatoes.

Beans beans the magical fruit, or seeds I guess, depending on how you are using them. I made the mistake of seed starting my pole beans indoors on lines that I ran from the basement ceiling. They germinated well and grew so fast that I ended up with bean plants crawling around the ceiling joists. They also grabbed anything that they could to support themselves which, rather unfortunately, wasn’t typically the lines that I had provided for them. Instead they grasped each other like survivors on a sinking ship, which turns out to be a rather apt analogy in this case. Ultimately I lost about half of the seedlings for two reasons: they were started too early and thus became too big to grow inside but the beds outside hadn’t been built yet so several died due to what amounts to exposure and the rest that died had become so entangled that I couldn’t plant them or separate them effectively.
On to the survivors then. I planted twenty(ish) plants, a mix of the following varieties: King Lima, Orient Wonder, 1000 Year Cave Bean, and Rattlesnake Pole Bean. All grew and produced well with the possible exception of the 1000 Year Cave beans; unfortunately they were a new variety for me to try and I wasn’t sure what to expect so I think I had trouble telling them apart from the Rattlesnake Pole beans. Ultimately this didn’t matter though because I learned something extremely important about myself from this bed: I have no idea what to do with the pods once they are harvested. I grew the Orient Wonder beans last year and those came out great again in 2022 (if a bit late to the party due to my seed starting issues), they are easy to use since they are cooked without shelling. Sidenote: King Lima are aptly named plants, the vines grew to at least ten feet long and were quite vigorous. If only I knew what to do with them once they were shelled.
The trellis that I made I have seen elsewhere referred to as a pole bean teepee, but reminds me more of an A-Frame house so that’s what I’m calling it. I lashed ten pairs of eight foot bamboo canes together (roughly six inches from one end) then stuck those in the ground at one foot intervals as shown in the picture. Then I lashed four canes together in two pairs with significant overlap in the middle to make the total length roughly eleven feet long and laid that across the top of the vertical supporting canes, then tied them in to make the structure rigid. This worked fantastically and held up to even strong wind storms with no issues.

Behold the smaller of the two pepper beds, which also shared space with a pair of Raven Zucchini plants. This pepper bed included the following varieties: Poblano, Italian Pepperoncini, Ghost, Jalapeno, and Serrano. Notice that there is quite a few plants all bunched together in the corner there, I had intended to thin the Ghost pepper plants once they grew a bit more. They grew but I didn’t thin them, which was a dumb experiment that I believe to be one of the reasons I only harvested a single ripe Ghost pepper in 2022.
I topped my pepper plants at roughly the one foot mark, then a few weeks later learned another important lesson: topping peppers isn’t just a one time during the season sort of thing, otherwise you end up with a pepper plant that’s four feet tall regardless of topping which needs supported on a cane. Ask my Poblano peppers how I know. Everything produced wonderfully aside from the Ghost peppers.
The other pepper bed (not pictured) included the following plants: Malabar (Climbing) Spinach to go up the trellis (which worked beautifully), Jalapeno, Serrano, some sort of “Rainbow Pepper” seed blend which was nearly all green bell peppers of an unknown cultivar, and Italian Pepperoncini. Of these peppers the Bell peppers were a nearly complete failure courtesy of blossom end rot, the Jalapeno and Serrano performed admirably, and the Italian Pepperoncini attempted to fill the planet with its progeny. I easily harvested at least fifteen pounds of Italian Pepperoncini peppers from this bed alone, and that was from roughly four small plants. They just… kept fruiting, over and over, from July through late October, and clearly pollination was not an issue. These I dried and mixed with other spices to make spice blends for my lovely wife who can’t handle anything actually spicy anymore. The rest were used fresh.
Next year I intend to string dry the harvested peppers so we’ll see how that goes. I’m also going to (obviously) thin them better next year and will adjust the spacing just a bit. The keen eyed of you can likely see in the picture here that some of the plants are stressed, that was a result of seed starting in pots that were too small which didn’t contain enough nutrients for the 6-8 weeks of indoor growing time. That’s likely the other reason that the Ghost peppers didn’t produce well actually, they were seed started under lights which I had too close to their pots and grew very slowly as a result, it took them nearly a month of being outside to sort of “wake up” which I believe delayed their flowering significantly.

This bed… this poor bed perhaps suffered the most from my inexperience. In the picture here you can see a number of plants growing: sugar snap peas (which did well), sunflowers (which were a partial success), and Festival Winter Squash (a total disaster courtesy of our small rodent friends). This bed was the most heavily shaded bed in the spring which is likely why the peas did great, by summer the surviving sunflowers were growing well, as was the winter squash.
Notice I said surviving sunflowers. The intent was to grow nine sunflowers in this bed which, admittedly, was probably a tad optimistic. That turned out not to be an issue though because something got at these plants and did a number on their stems near the ground. The damage looked like something was slicing the stems vertically for about two inches or so, causing the stem to bend in that spot. That bend would then make the plant too heavy on one side and it would fall over. At first I suspected that I had a Sunflower Stem Weevil issue but found no trace of them in any of the plants that died. Interestingly two of the plants recovered from the damage and grew to about seven feet tall with nice flowers and great pollination, so I’m not sure what the cause was. Now I suspect that it was a pest looking for something else (such as a squash vine borer), or possibly chipmunk related damage.
The Festival winter squash made me sad because it grew really well and set fruit, the moment that anything grew to a decent size it was destroyed by squirrels. This damage was the turning point for my opinion of squirrels in the garden. I didn’t complain that much when they dug up and killed all but three of my strawberry plants (they killed 45 of them in the process), I didn’t complain when they dug around my newly planted Fall Gold raspberry plants which killed half of them and stunted the other half, and I only complained a little when they dug an enormous hole in the eggplant bed. I wouldn’t have believed it was squirrel damage by the size of the hole had I not caught them in the act. Then they ate my nice little squash and half of my father’s watermelon that he was so excited about growing and my opinion of them changed.
This bed is now planted with my garlic, shallots, and elephant garlic for a spring harvest. I’ve taken what I hope to be adequate squirrel prevention measures. I just checked it today (11/27/22) and see nothing poking up through the mulch yet, which is slightly worrisome, but at this point there’s nothing to do but wait it out and see what happens by early spring. We need our fix of grandpa garlic and this will likely be our primary source for it next year. To clarify: grandpa garlic is what we call the variety of garlic that my grandfather-in-law grows. Pretty sure we don’t actually know what it’s actually called at this point… actually.
How it started…

How it’s going.

Gaze upon the watermelon of sadness and know despair.

This bed was the potato bed, which is also growing bunching onions and cucumber.
Fun fact: prior to 2022 I had never seen what a potato plant actually looks like when it is growing. Neat.
The potatoes that I planted came from a combination of store bought Yukon Gold potatoes that had sprouted as well as a package of seed potatoes of some russet variety. Both produced potatoes but the seed potatoes definitely performed better, I’m happy with how this turned out regardless.
I learned somewhere (I believe it was in one of Luke from MIGardener’s videos) that you can also use organically grown potatoes bought from the supermarket as a sort of de facto seed potatoes because they are unlikely to have been sprayed with a powerful sprout inhibitor. I had tried to find organically grown potatoes to plant in 2022 to test this but I guess I didn’t try that hard because I didn’t manage to find any. I’ll be on the lookout in 2023 to see if I can source them.
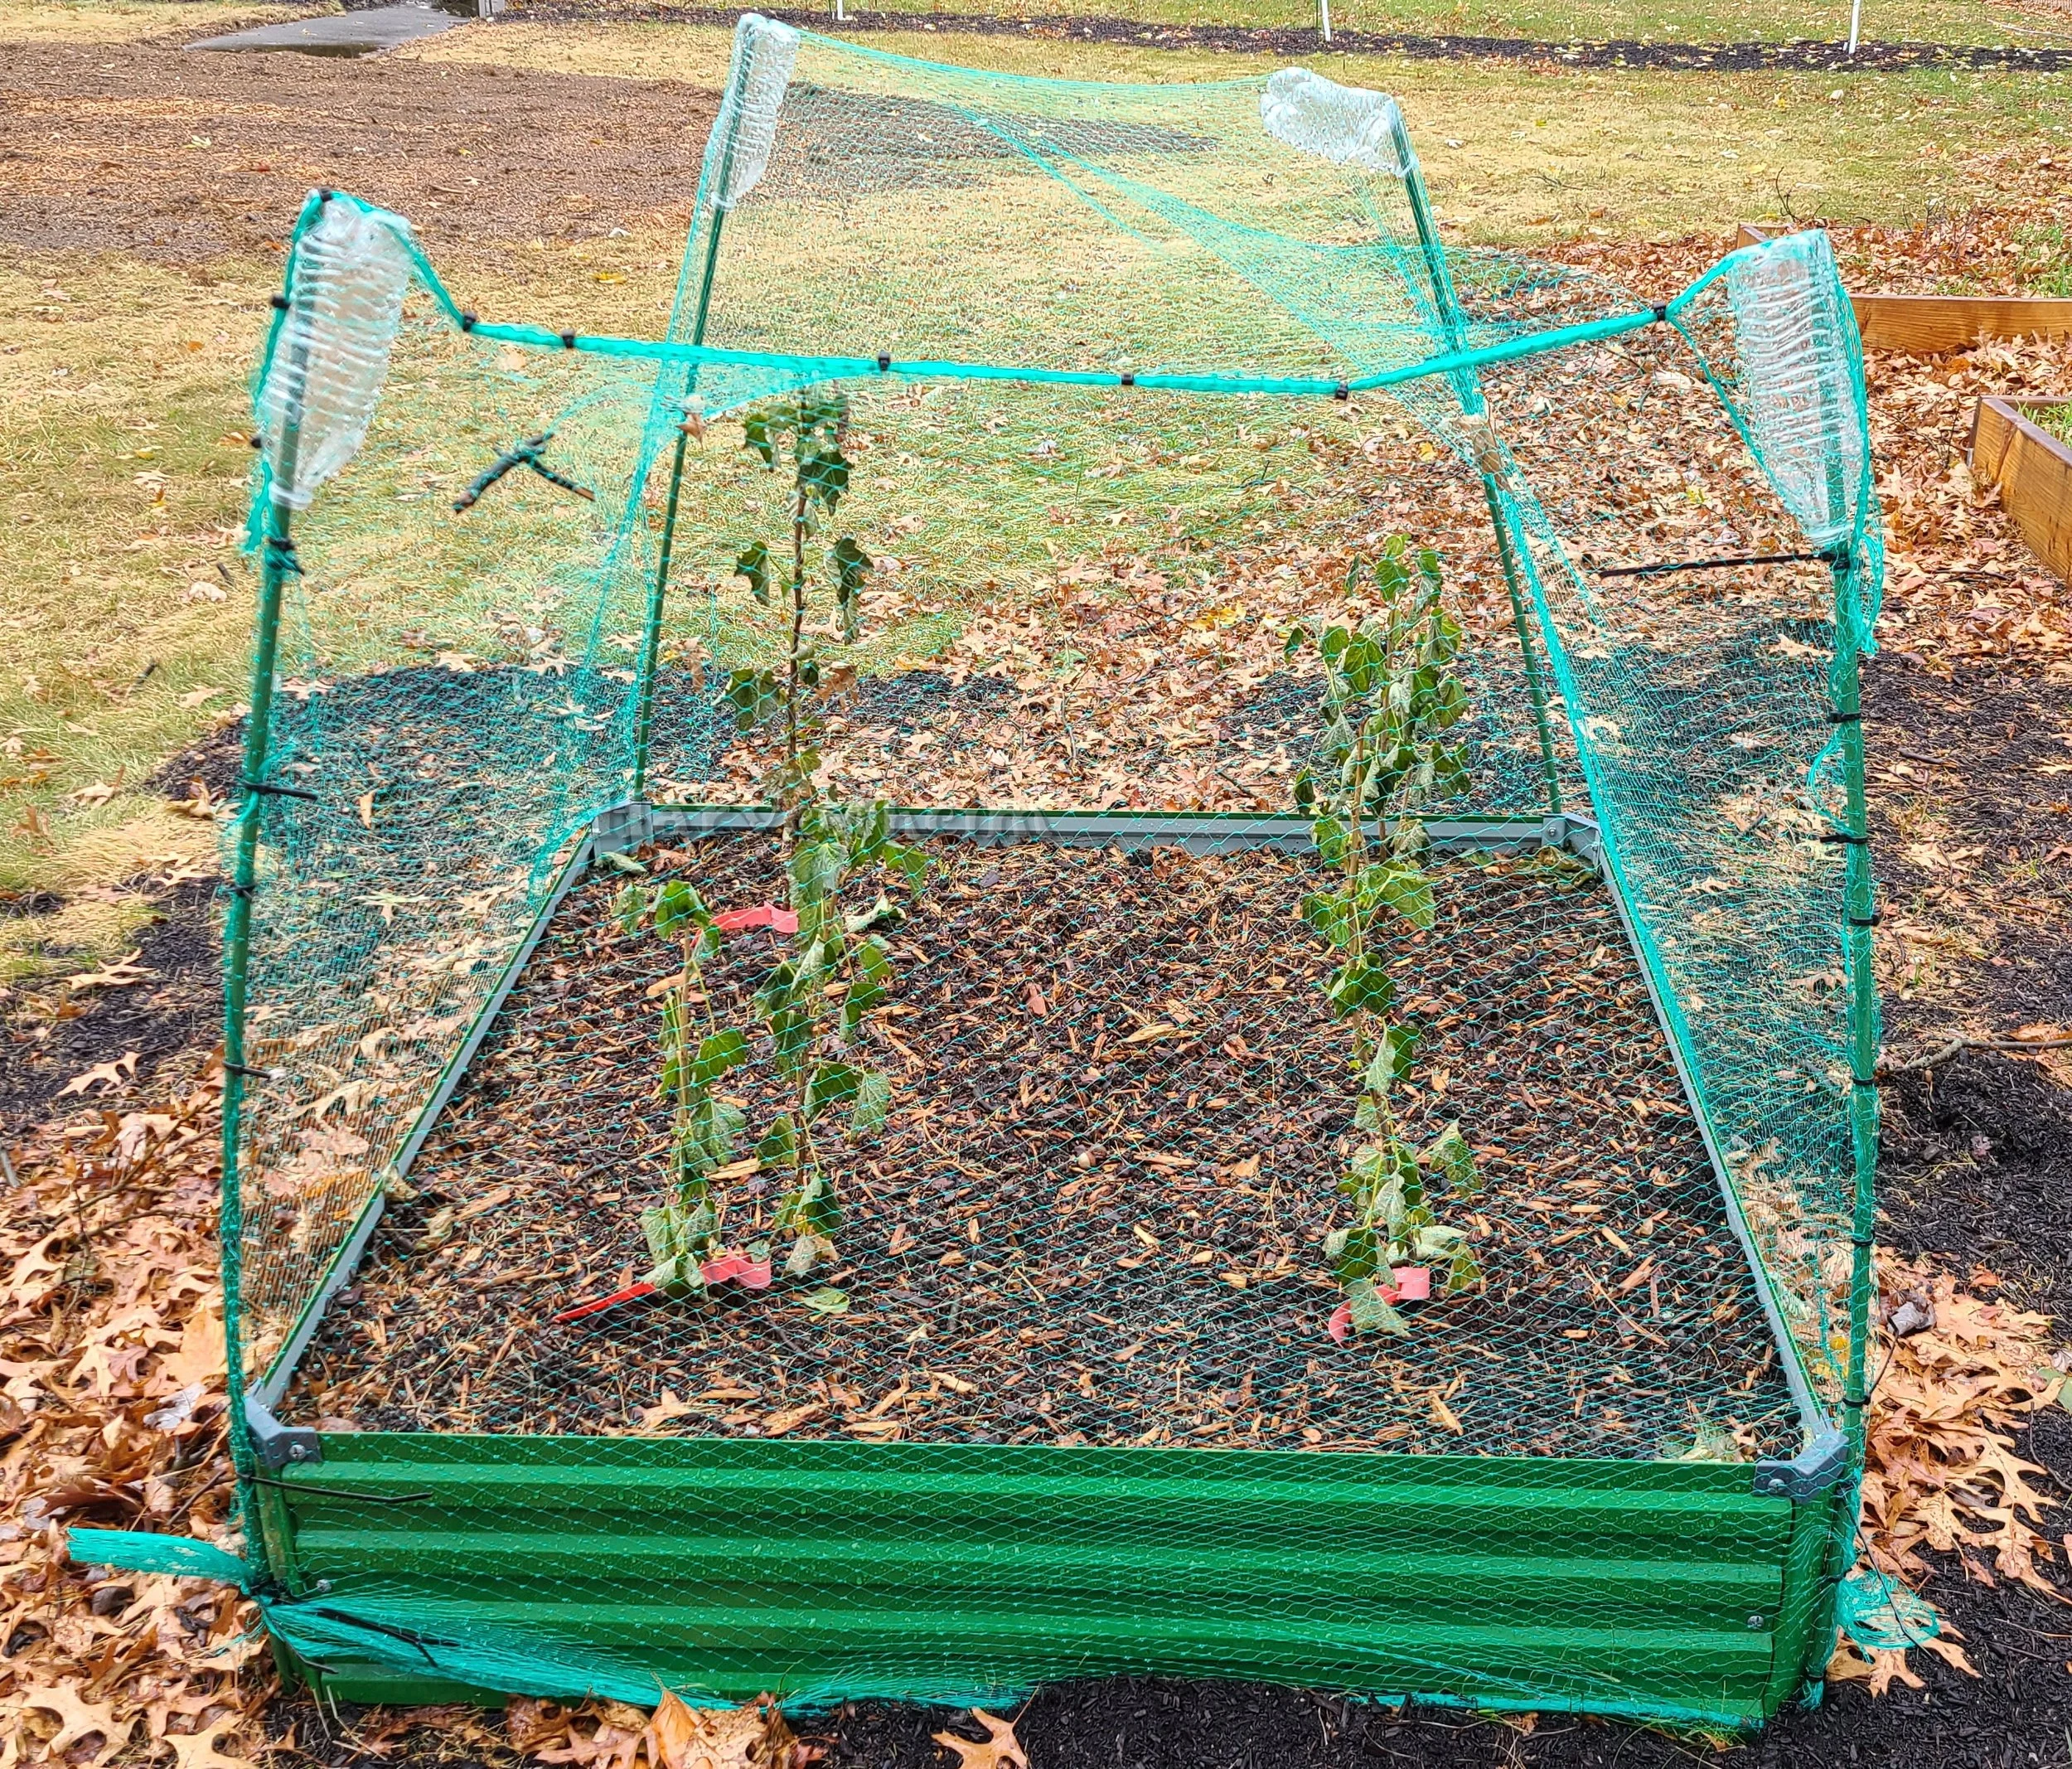
This bed is my Currant bed, and is one of the additions that I am most excited about in the garden for 2022. That and the apple trees that you can just barely see the bottoms of in the picture, but those will be next up.
The variety of currants is Pink Champagne, supposedly one of the absolute best varieties for fresh eating. This bed was a later addition to the 2022 garden, being installed on September 14th. Currants have been historically a bit difficult to source in the United States, courtesy of Black Currants acting as a host/transmission vector for White Pine Blister Rust, a fungal infection that threatened the logging industry here in the early 1900’s. By 1911 the federal government banned currants and that’s why we have grape Skittles, because that’s not a thing anywhere else really.
The federal ban on black currants was lifted in 1966. The state bans on currants are still slowly being lifted across the country, as of 2015 state law in Ohio strictly regulates the planting and transportation of black currants (allowing seven varieties) but allows red currants, and all currants that aren’t black are technically red currants. As of January 2022 the state laws for Michigan are a bit stricter for red currants and less strict (in theory) for black currants, requiring a permit to plant black currants of any variety and possibly requiring a permit for red currants if they are being planted in a WPBR control zone, but alpine currants are fine. I guess I’ve never heard of alpine currants prior to now. I can’t seem to find anything regarding the legality of currants of any variety in Indiana.
Though the content at this link is a bit dated (current as of 2015 it seems) maybe for starters check here if you live in a different state, just to see before making any purchases: LINK HERE
Anyways, I’m stoked about Pink Champagne currants and hope they do well. They look a bit sad in the picture but that’s just because it’s late November, everything in the garden is looking a bit sad except for the Kale.
Also worth noting: the bed itself is different from the others, being constructed out of metal instead of wood. I ordered this bed off of Amazon for less than $50 in early September of 2022. The brand is DIIYIV, they don’t seem to offer this size and color combination anymore. Eventually I’ll do a product review for the bed but know now that I’d recommend it: it was more affordable than wood at the time, easier to move, fairly easy to build. I’d like a bit of a taller bed but that’s not a failing on the manufacturer.